
Mechanicus Standard Yellow Paint Scheme Pt2


Mechanicus Standard Yellow Pt2

This is a follow up to some of the other techniques that I've used to complete my yellow scheme.  I look at the mechanicus army as this interesting hodge-podge of technologically enhanced cyborgs and insane priests with no real homogenious


Metal:

  • Vallejo Metal Color - Burnt Iron
  • Vallejo Metal Color - Steel - application should be on high points areas that woul be clean
  • Citadel - 50/50 Nuln Oil and Agrath Earthshade
  • Drybrush - Rub n Buff - Grecian Golden - get rid of almost all product on the brush prior to application you're looking to highlight the edges you don't want huge streaks
  • Drybrush - Rub n Buff - Pewter - Grecian Golden - get rid of almost all product on the brush prior to application you're looking to highlight the edges you don't want huge streaks
  • Gloss
  • Burn Umber Oil Wash remove excess w/ white spirits, should be in deep recesses or AK Interactive Ruststreaks/Streaking Grime for Yellow Vehicles
  • Apply pigments if desired for rusted ares
  • If you're going for a highly rusted worn metal look like on the Kataphron above you can achieve this with multiple coats of AK interactive track wash, rusted crusted wash and a follow up with a gunmetal dry brush
  • Matte Cote


Blue Glow/ Lens:

  • Kantor Blue/ Midnight Blue, base the entire area that you want to be glowing
  • Vallejo Game Air - Magic Blue,
  • Vallejo Game Air - Electric Blue
  • Drybrush/ Edge Electric Blue + White, or apply the white dot to the dark area in your lens
  • If you really want to amp up the plasma glow effect I recommend using Nihlac Oxide from Citadel.


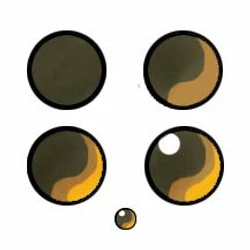
 I often times get asked how to paint a lens.  Its actually rather simple, below is an excellent graphic I found that illustrates how to do it effectively.  Don't forget the white dot at the end, it really sells the effect.  You can use a tooth pick or even a pin to apply the white dot.  It sells the reflection and adds a 3D effect.


Comments

Popular posts from this blog

How to Paint: House Raven Pt1

How to Paint: Grim Dark House Raven Pt1 A Quick Note on Tools: – My primary paint tool is an airbrush, this is how I quickly lay down base layers, shading and even some weathering.  It’s really good for larger models because you’re going to avoid so many of the headaches that come along with large flat panels like brush strokes, uneven paint, time, etc That being said, in the end you’re still going to need a brush for all that detail work so find a good balance.  My airbrush setup is as follows: Iwata Eclipse HPCS -.50mm 2 Gallon Badger Compressor w/ regulator and water trap 6ft hose Another water trap right before the airbrush (because I live in a humid area) Sub-Assemblies – Knights and larger models in general lend themselves well to sub-assemblies.  It allows you to spray paint or airbrush the larger panels while avoiding overspray onto the ligature and support structures of the knight.  For this build I assembled the chassis, leg...

How to Paint: Martian Terrain and Sector Mechanicus Buildings

How to Paint: Martian Terrain and Sector Mechanicus Buildings I glued down the buildings with Gorilla Glue. I Built the ground up with equal parts plaster, cellulose fiber and water by volume. Once dry, I covered that in pebbles, sand and then a grey dry grout mix and soaked everything with rubbing alcohol to break surface tension and then a slurry of pva glue and water to bind all the loose debris. I airbrushed in some of the ground that was not covered with the grey grout mix once everything was dry w/ black and then Crusty Rust enamel wash from AK interactive in a molted pattern. I spread rust colored pigments over large swaths of the ground to create a natural martian looking surface. I had some reference pictures from the NASA missions.  Martian chemical tank with rusty top.  Rust is done with the AK interactive rust and crust shot through an airbrush. I secured all the pigments by spraying everything with rubbing alcohol. I noticed some of the matte varnish ...